Mountain School @ Home Lesson 18: Water Cycle
![]() Students! Parents! Teachers! During this time of school closures and stay-at-home guidelines, North Cascades Institute is sharing lessons and activities from our talented Mountain School instructors. We hope these will inspire students of all ages to continue to learn about the natural world and discover new connections to the outdoors from home. This lesson was created by Senior Program Instructor Alexa Brandt. Find more lessons and activities on our blog or website.
Students! Parents! Teachers! During this time of school closures and stay-at-home guidelines, North Cascades Institute is sharing lessons and activities from our talented Mountain School instructors. We hope these will inspire students of all ages to continue to learn about the natural world and discover new connections to the outdoors from home. This lesson was created by Senior Program Instructor Alexa Brandt. Find more lessons and activities on our blog or website.
During this Mountain School at Home lesson, we will explore how water moves around our planet by making observations, conducting an experiment, and creating a story about the water cycle! This is a 5-part lesson so feel free to complete this lesson all at one time, or leave and come back to different sections if you need a brain break.
Before you begin: Reflect, discuss, or jot down some thoughts about the following questions…
- What do you already know about water?
- What are you most curious about?
- Which body of water (ocean, lake, stream, river, pond, etc.) is closest to you?
- Which body of water is your favorite or that you feel most connected to?
PART 1: Forms of Water and Water on Earth
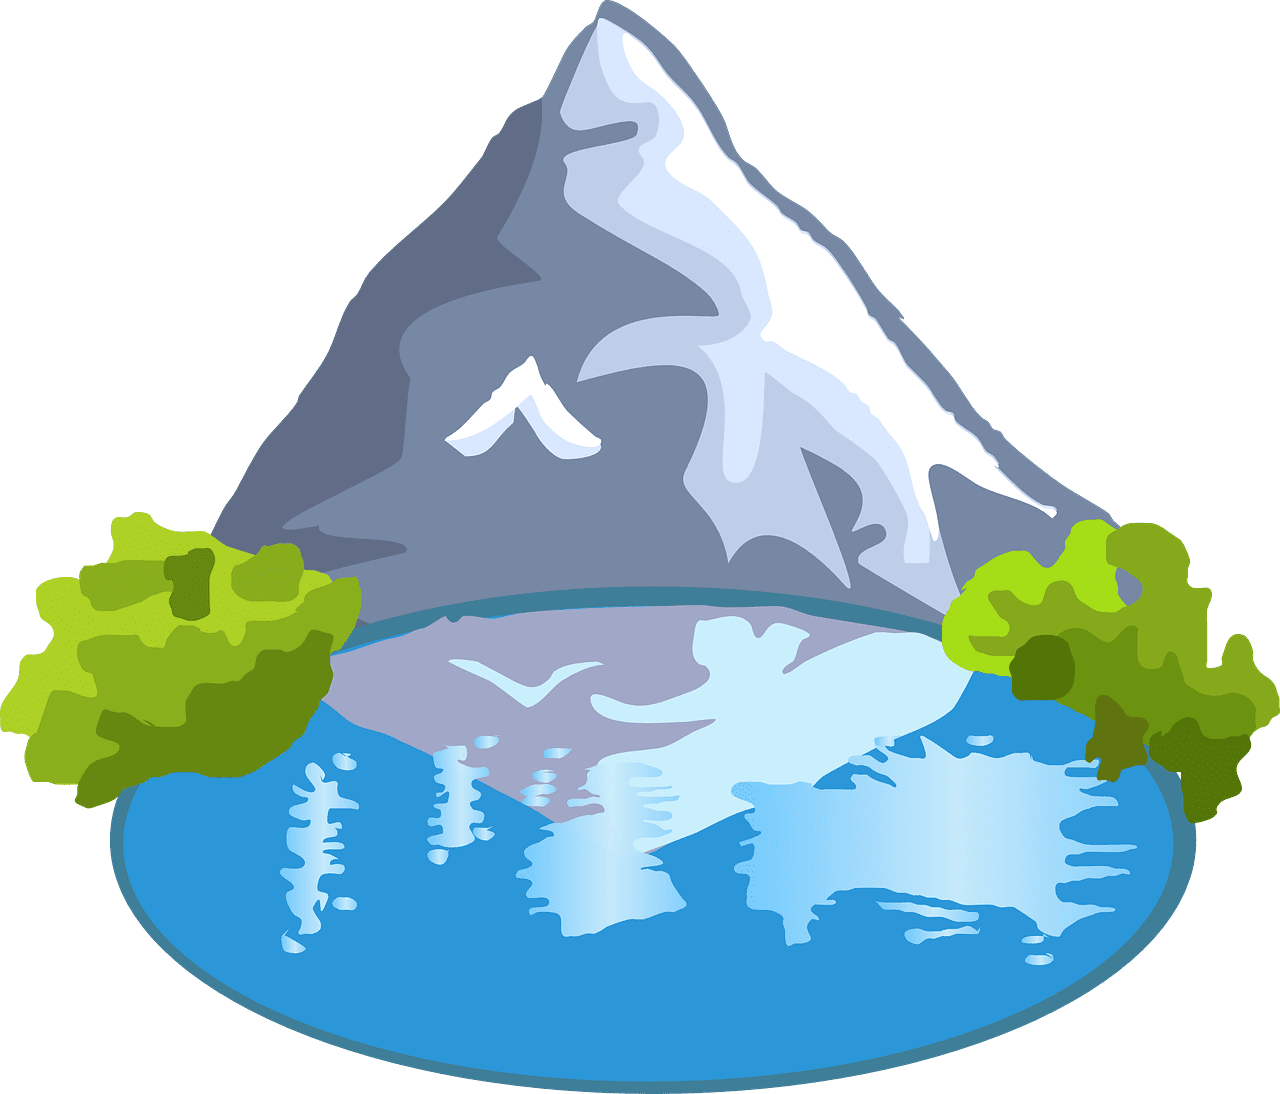
Take a look at this picture of Diablo Lake in winter, taken from the Diablo Lake Overlook in North Cascades National Park. Note how many different forms of water you can spot.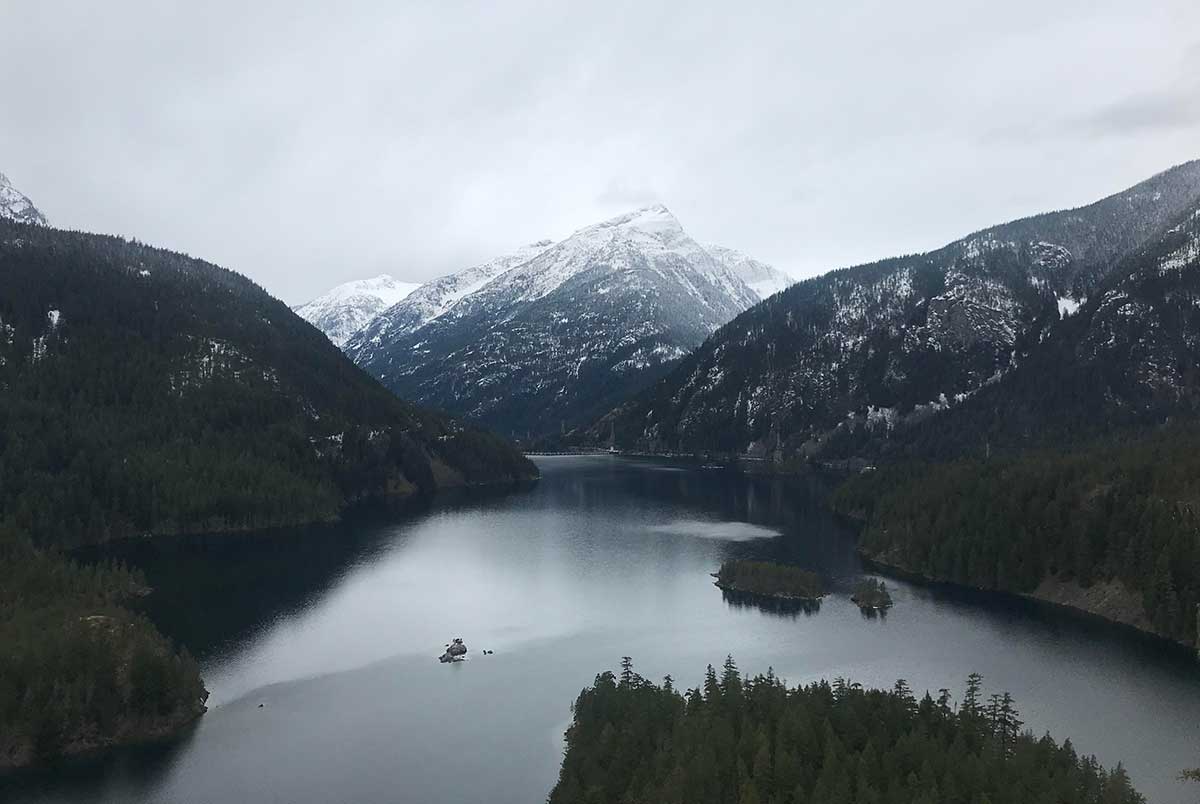
When we say “forms”, we mean different physical states that water molecules are in. This could be liquid, solid (ice), or gas (water vapor), which is mostly dependent on temperature. Think about observations you might have made of steam coming from boiling water or icicles forming in the freezing cold. If you are unsure, give it your best try and after going through more of this lesson, you can always come back to this.
To give some context and to get a sense of how much of the water on earth is salt water vs. fresh water, check out this short video on YouTube:
All the Water in the World Demonstration Video
QUESTIONS: What surprised you? What was one thing you learned? How does this change how you look at the picture above?
PART 2: Water Moves!
Now look at this picture of Diablo Lake in the summer and compare it to the one we examined before. Note the differences or similarities with the forms of water that appear to be present.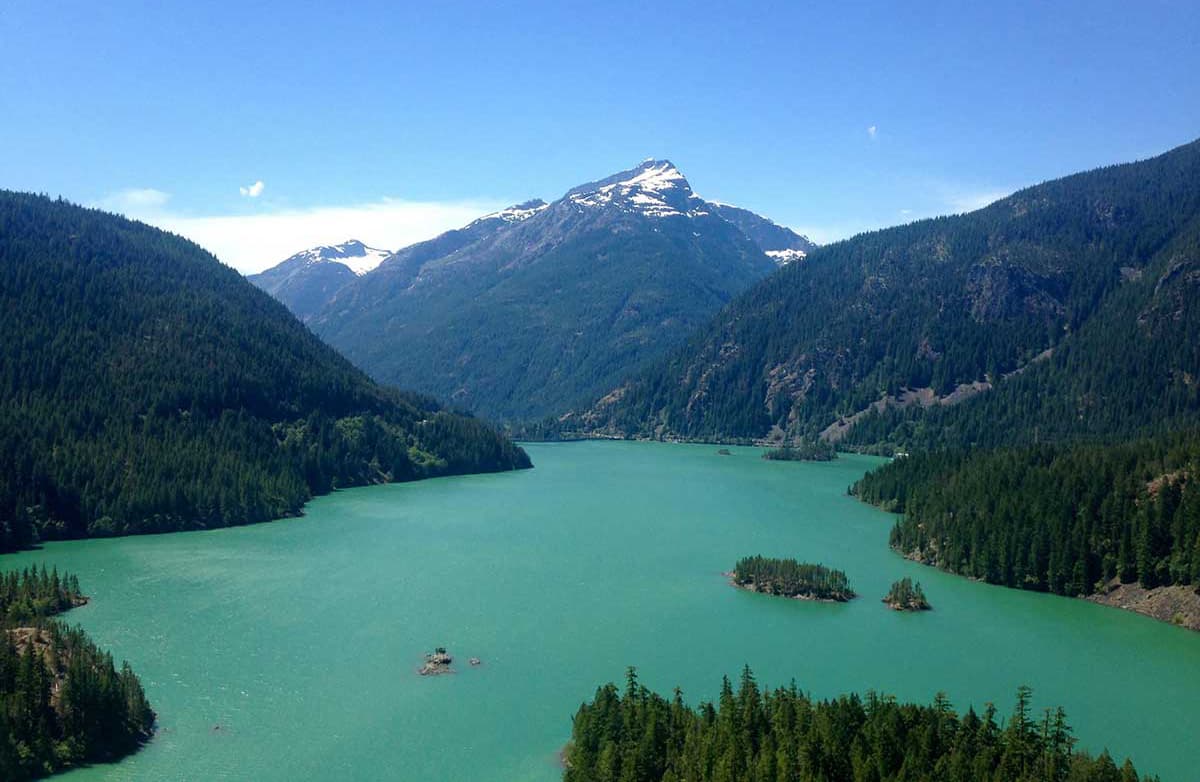
- What do you notice?
- What questions do you have?
You may have noticed that there is far less snow present, fewer clouds (yes, there’s water up there!), and the lake water is a milky turquoise in the summer picture versus a dark blue-gray in the winter.
- Where do you think the snow has gone? Do you think that water has disappeared forever?
Did you know that most water on our planet has been here the whole time? Can you imagine a dinosaur drinking the same water molecules you are drinking today? Whoa!
Water is constantly moving around our world. You may have learned from Mountain School @ Home Lesson 15: Watersheds that “a watershed is the land where water flows and empties into the same place”. That being said, not all water molecules are destined to stay contained within a specific watershed forever. Over time, water changes form (liquid/water, solid/ice, gas/water vapor), and moves around depending on certain conditions. But how does water move? The water cycle, of course!
PART 3: It’s water cycle time!
Welcome to the water cycle! This diagram is a simplified way to describe how water moves around our planet. For the purposes of this activity, we are going to focus on Evaporation, Condensation, Precipitation, and Collection/Saturation (noted in the diagram as Surface Runoff and Groundwater). If you feel excited about water at the end of this lesson, we encourage you to investigate Transpiration on your own!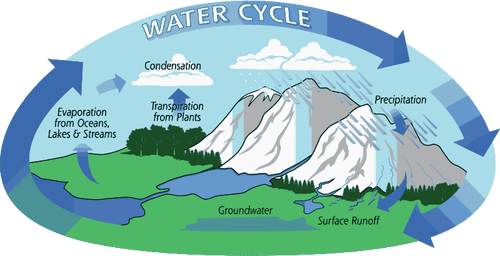
Here we will briefly go through the different stages and then introduce an activity that you can do at home to demonstrate the water cycle.
 EVAPORATION: Think back to the very beginning of this lesson. What did you say was your favorite body of water? Now imagine one teeny tiny water molecule in that body of water. This is where we’ll begin.
Imagine a sunny, warm day. As the water molecule slowly warms up, it, along with all its friends, begins to move faster and faster, and as it does, it turns into water vapor. This transformation from liquid water to gas is called evaporation.
 CONDENSATION: Okay, so your water molecule is now in a gas state and is floating in the air. As it gets higher and higher, the temperature gets colder and colder. If you need help visualizing this, think about how most often there is more snow at the top of a mountain versus at the bottom of it.
That cooling helps your water molecule transform back into its liquid state, which we describe as condensation. As your water molecule condenses in the sky, it groups together with other water molecules to form clouds! You could imagine these water molecules getting cold and huddling together (making clouds) with other water molecules.
 PRECIPITATION: As your water molecule hangs out in its cloud longer and longer, more and more water molecules condense and add to the cloud. Even though clouds can get quite large, they cannot hold an unlimited number of water molecules. As they get heavier and heavier, something has to give!
Imagine your water molecule in the biggest cloud you have ever seen. When the cloud reaches its limit, it releases water molecules as precipitation, in the form of rain, snow, hail, etc. What form of precipitation would you want your water molecule to fall as?
 COLLECTION/SATURATION: As your water molecule falls from the cloud, one of the things it could do is fall all the way down to the Earth’s surface. Once it is there it could collect or fall into existing bodies of water (oceans, lakes, rivers, etc.) or even saturate (soak) into the ground and collect as groundwater. Where would you like your water molecule to collect or saturate?
Congratulations! Your water molecule has made it through the water cycle! Note that we just went through one example of movement through this cycle. These steps can happen in many different orders and over very different timelines.
PART 4: Water cycle experiment
This next experiment will help demonstrate some of the stages of the water cycle. Before you get started, these are the items you will need:
- Large bowl
- Mug or cup
- Plastic wrap (alternatives: shower cap or other clear material that can fit over the bowl)
- Rubber band, tape, or string (to help fasten plastic wrap to bowl)
Step 1: Set a mug or cup inside the large bowl.
Step 2: Pour water into the bowl, around the mug or cup (not inside the mug). The water level should come up about 2/3rds of the way to the top of the outside of the mug.
Step 3: Cover the bowl tightly with plastic wrap. Securely attach it with string, a large rubber band, or tape to seal it to the bowl.
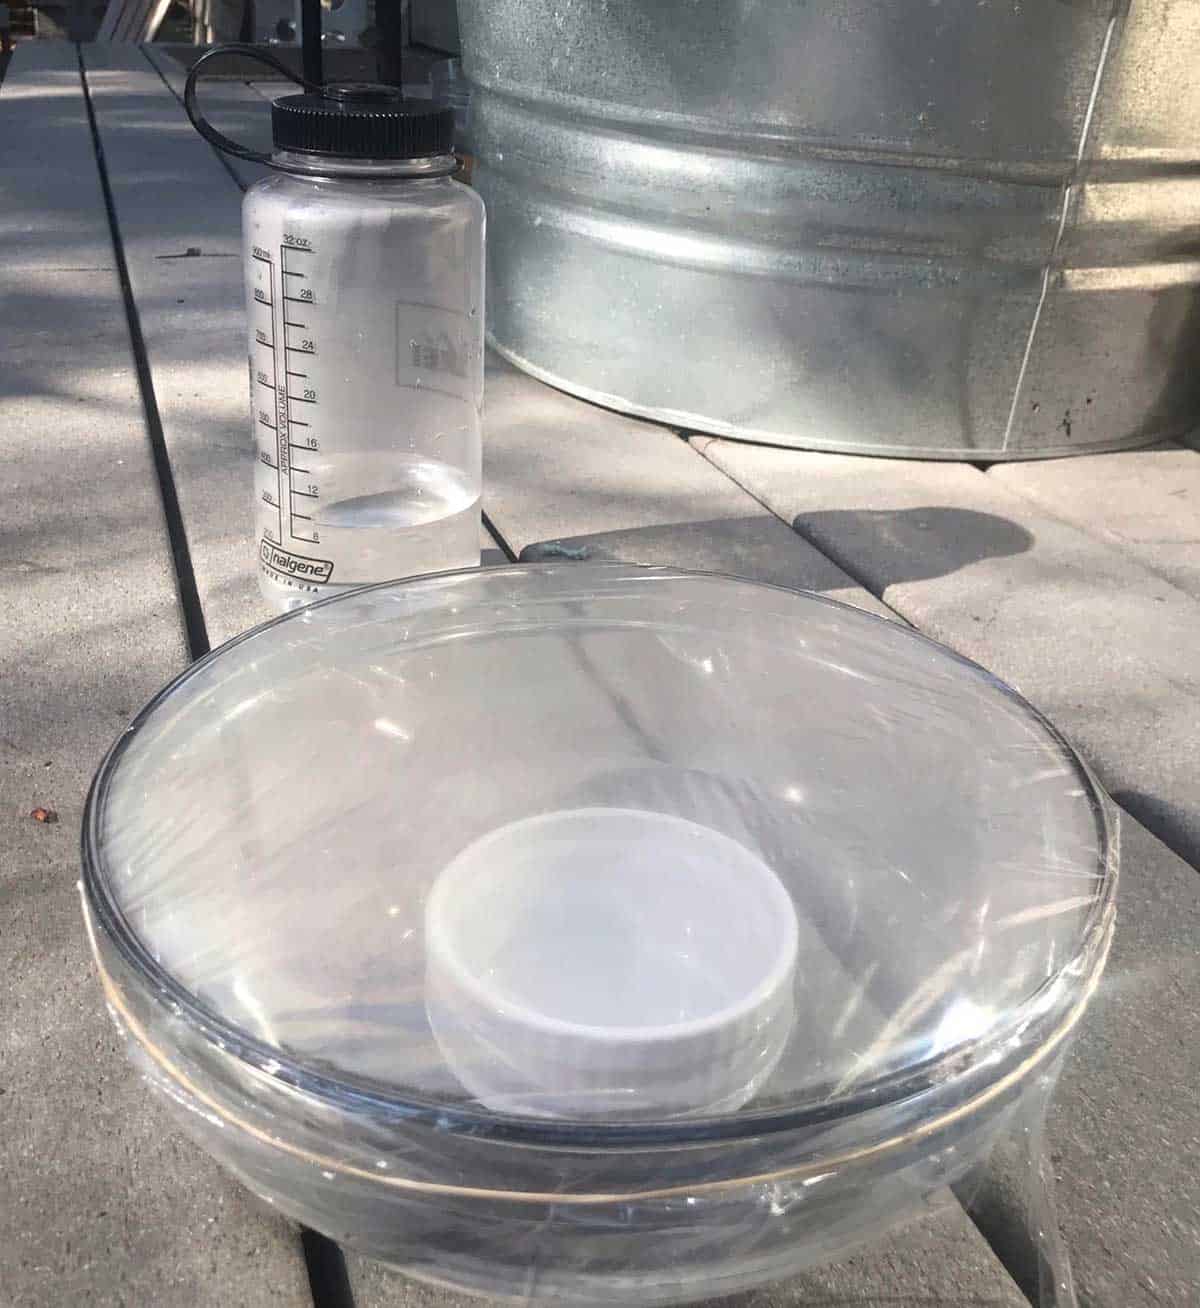
Step 4: Set the bowl next to a sunny window or outside in a spot that gets direct sunlight.
Step 5: Let the bowl sit as you observe any changes that happen over the next few hours.
Another alternative: If you don’t have those items, you can fill a clear water bottle with an inch or so of water, put the cap on, and stick the water bottle in direct sunlight for a few hours.
Step 6: After a few hours, observe and reflect on these questions…
- What do you notice about the bowl?
- Where do you see water now?
- How is that similar or different from the beginning of the experiment?
- How do you think the water moved?
Nice work, scientist! This model demonstrates the water cycle on a small scale. You may have observed that the water level in the bowl went down over time. You may have noticed that water droplets collected on the plastic wrap and water dropped into the mug in the center of the bowl. If you didn’t notice this, make sure your bowl is in a sunny, warm spot and feel free to run a second trial (try again!).
As the water was heated by the sunlight, those water molecules evaporated (turned to water vapor). As they rose or lifted up, they hit the plastic wrap, cooled, and condensed into water droplets. You may have observed them clinging to the plastic wrap. As those water droplets gathered on the plastic wrap (like clouds), they grouped together in the center, and when it became too heavy, they were dropped as precipitation into the mug below where they were collected. So cool!
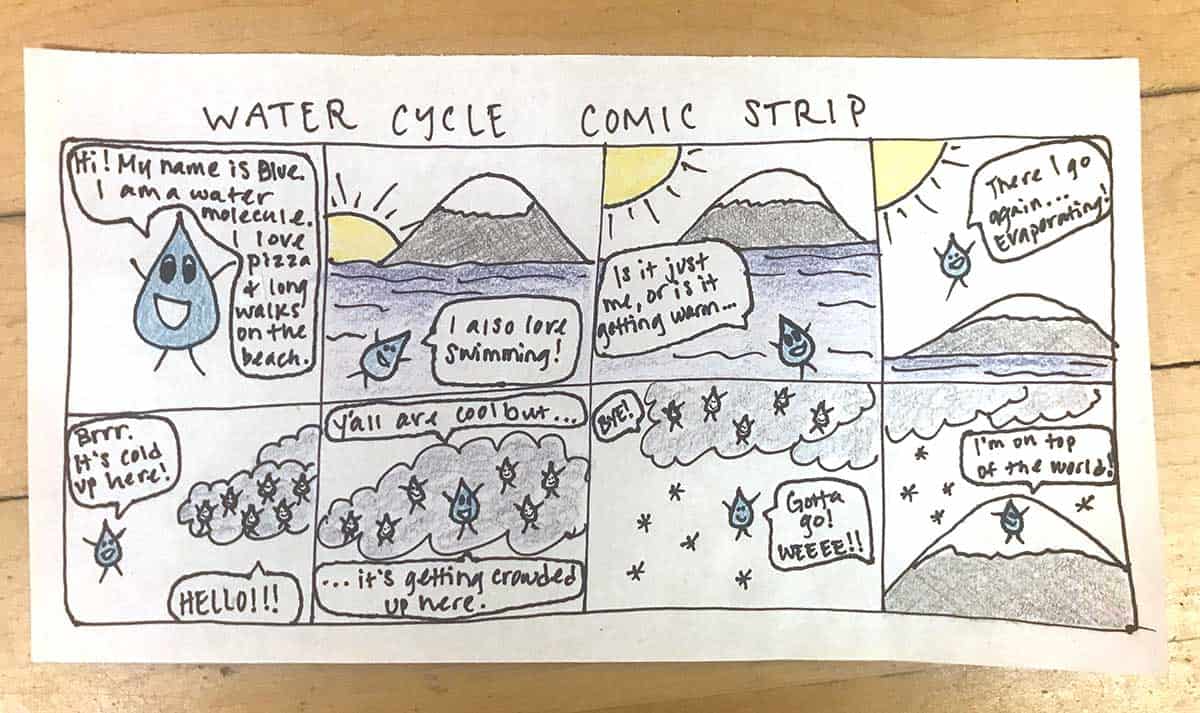
PART 5: Time to get creative!
Now that you have thoroughly explored the water cycle, it is time to get creative. On a blank sheet of paper, your final task is to write a story or draw a comic strip about the journey of a water molecule. You can name your water molecule whatever you like, feel free to make it silly! Take your water molecule on a journey through the water cycle, in no particular order. You can have your water molecule begin its journey anywhere- the top of a glacier, a cloud, the middle of the ocean, inside someone’s water bottle- the possibilities are endless! You could keep your water molecule within a certain watershed or allow it to travel far and wide, across our planet. When your molecule moves somewhere new, remember that the different stages of the water cycle can help it do so. Try to include each stage of the water cycle at least once. Let’s see what you come up with!
Reflection Questions
Reflect, discuss, or jot down some thoughts about the following questions:
- What was the most interesting thing you learned in this lesson?
- What is your favorite phase of the water cycle?
- What questions do you still have about water or the water cycle?
- How many different ways do you rely on water in your daily life?
- What is a way that you can care for a body of water (lake, stream, river, etc.) near you?
More Resources
All the Water in the World Demonstration Video
Mountain School @ Home Lesson 15: Watersheds
Mountain School @ Home Lesson 16: Glaciers
NASA The Water Cycle
Leaf Transpiration Experiment Video
Download lesson as PDF
Thank you for helping us offer these at-home lessons for transformative learning experiences in nature by making a gift at www.ncascades.org/give.