Mountain School @ Home: Lesson 10 – Create your own Treasure Map
![]() Students! Parents! Teachers! During this time of school closures and stay-at-home guidelines, North Cascades Institute is sharing lessons and activities from our talented Mountain School instructors. We hope these will inspire students of all ages to continue to learn about the natural world and discover new connections to the outdoors from home. This lesson was created by Mountain School instructor Bre Harris. Find more lessons and activities on our blog or website.
Students! Parents! Teachers! During this time of school closures and stay-at-home guidelines, North Cascades Institute is sharing lessons and activities from our talented Mountain School instructors. We hope these will inspire students of all ages to continue to learn about the natural world and discover new connections to the outdoors from home. This lesson was created by Mountain School instructor Bre Harris. Find more lessons and activities on our blog or website.
Create Your Own Treasure Map
Practice your map and navigational skills by creating your very own treasure map!
First, think about the map you want to make. It could be a path that uses landmarks, or it could be a list that includes directions and distances. Make sure the start is easy to find, and the treasure is hidden somewhere where it won’t be disturbed until the treasure hunters find it.
Materials:
- Paper
- Pen
- Pencil
- Tea bag (optional)
- Compass (optional)
Create your map using landmarks:
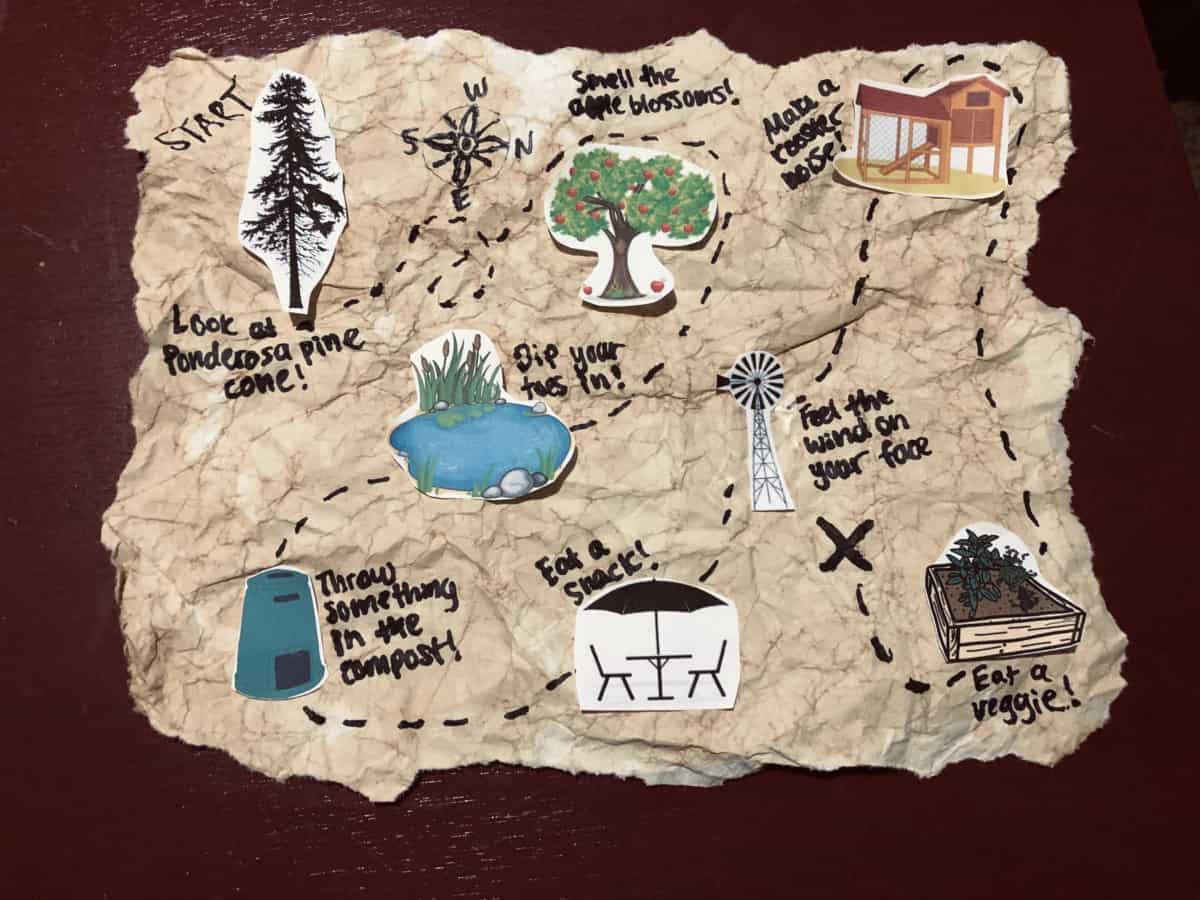
- Use a piece of white paper and tear the edges off the page. Wipe a wet black tea bag over both sides of the paper. Let it dry for a couple of minutes and then crumple it up into a ball and let it dry for a few hours. This will make it look well worn!
- When deciding on landmarks, use large, easily identifiable objects that will not move location before the hunt.
- When picking a “treasure” to hide, don’t hide anything valuable. For example: Draw treasure on a piece of paper. Mark the burial location with an x, sticks, or a flag, so the hunter knows where to dig.
- Draw your map including a compass. Make it fun by creating to-do items along the way, such as looking at a Ponderosa Pine cone, or dipping your toes in a pond!
- Find someone to give your map to and see if they can find the treasure!
Create your map using directions and distance:
- Decide where you are going to stop along the way and use the compass to write down the directions required to reach the next location.
- You will need a compass for this method. If you don’t have one you can access one on a smartphone, iPad, etc.
- Once you have all of the directions written down for each of the stopping locations and the treasure location, cut out the directions and place them in the correct stopping locations.
- Find someone to give your direction to and give them the starting location and the first set of directions.
Hint: It would be helpful to compare the distance of your step with the distance of the hunter’s step, so they can do their best to match your steps.
Example Directions:
Location 1: Ponderosa Pine Tree
Start under the tallest Ponderosa pine tree in the backyard. Take 20 steps to the south and 5 steps to the west and read your next clue!
Location 2: Apple Tree
Smell the blossoms and take 25 steps to the south and 9 steps to the west to read your next clue.
Location 3: Pond
Dip your toes in and then take 10 steps to the south and 4 steps to the east to read your next clue.
Location 4: Compost
Stir the compost and take 30 steps to the north to read your next clue.
Location 5: Deck Table
Take a break in the shade before taking 10 steps Northwest to read the next clue.
Location 6: Chicken Coop
Crow like a rooster before taking 5 steps to the north and 28 steps to the west to read your next clue.
Location 7: Windmill
Feel the wind on your face before taking 38 steps to the east to read your next clue.
Location 8: Vegetable Garden
Snack on some fresh veggies while taking 2 steps to the south and 6 steps to the west, where you will find the buried treasure!
How to use a compass:
Before embarking on your adventure, learn more about how compasses work and how to use them for basic navigation! Watch this video to learn.
Thank you for helping us offer these at-home lessons for transformative learning experiences in nature by making a gift at www.ncascades.org/give.